

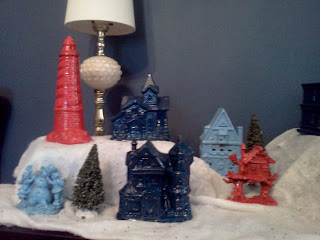
My goal with my color choices was to be able to use the same little houses for a Christmas village after Halloween. Here's what I came up with:


I chose baby blue and bright red to compliment the navy blue for a retro Christmas feel.


You can string a strand of white twinkle lights amongst the houses to light them up. (The Dollar Tree houses need a little poking in the window holes with a wooden skewer to open them up a bit more.)

I used a sheet of white glitter cotton batting as a base and used books and other random objects as risers.

Variations:
 Gnome Village: I love these plush mushroom ornaments at Target last year! Imagine a tiny Christmas gnome village with these mushrooms scattered amongst the houses. Those green mossy rocks from the Dollar Tree would be great additions. Lay a couple of twiggy branches in the background and add a couple of red cardinals form the Dollar Tree to the branches and tops of the little houses. Use boxes wrapped in birch wood scrapbook paper as risers topped with moss sheets or wood print paper. Sprinkle the rest of the risers and table top with flakey fake snow. For fun, add a few miniature garden tools, shoes or other gnome accessories as if the gnomes were just away for the moment from their homes on holiday errands.
Candy Land: Use flakey fake snow or glittered scrapbook paper as a base. Use some fake candy canes and lollipops stuck in lumps of modeling clay as a picket fence. Scatter other candy and cookie ornaments amongst the houses as decoration. Make paths with contrasting paper edged in real or decorative gumdrops. Use cookie tins as risers. Use real or ornament gingerbread men as village inhabitants. For fun, play homage to the the witch from Hanzel and Gretel by placing a small broom outside one of the houses edged by a fence of gingerbread men.
Fairy Christmas Village: Place the houses on glittered batting sheets or a scattering of flakey fake snow. Tuck silver or glittered Poinsettia blooms amongst the houses. Use foam cones or paper cones covered in pastel or white feathers to make feather 'pine' trees. have a few feather butterflies sitting on the trees or houses. If you have fairy ornaments. scatter them as village inhabitants. You can also make your own like these ones here. You can dangle glittered snowfakes ornaments above the village on fishing line.
Valentine Village: Use just the red houses (3 will do). Use white serving dishes like stemmed bowls, cake plates, etc as risers. Top them with fabric doilies from the Dollar Tree. Drape the risers with strings of pearls, white fluffy feathers and sparkly jewelry for a romantic look. You can also just place the three houses on inverted wine glasses with red roses placed underneath as a table centerpiece over a few overlapping doilies.
St Patrick's day Village: Use just the navy blue houses on sheets of green moss. Scatter mossy rocks amongst the houses. print a large rainbow and ticky tack to the wall behind the houses. Use little black cauldrons from halloween favors or black salsa dishes from Dollar Tree and fill them with plastic or chocolate gold coins. Use paper wrapped canisters as tall risers and prop tall little ladders made of hot glued twigs up to the houses. Spray paint a few stones or glass rocks gold and make a pile or two. Just for fun, fill one couldron with lucky charms (leprechaun food).


