Pages

Thursday, June 7, 2012

Wedding Shower Bridal Book Game


A fun Wedding shower or Bridal Shower game that is very interactive, and is a great ice breaker.  To play the game, the Bride or Groom starts by reading the first page and passing it to the appropriate person.  Each person passes it on each page and the last one holding the book is the winner!

First get a note book, photo brag book or mini scrap book like this one that I got at the Dollar Tree below.  I actually bought two of them for extra pages and added the pages from one into the other.  You will need 12 full spread pages.   


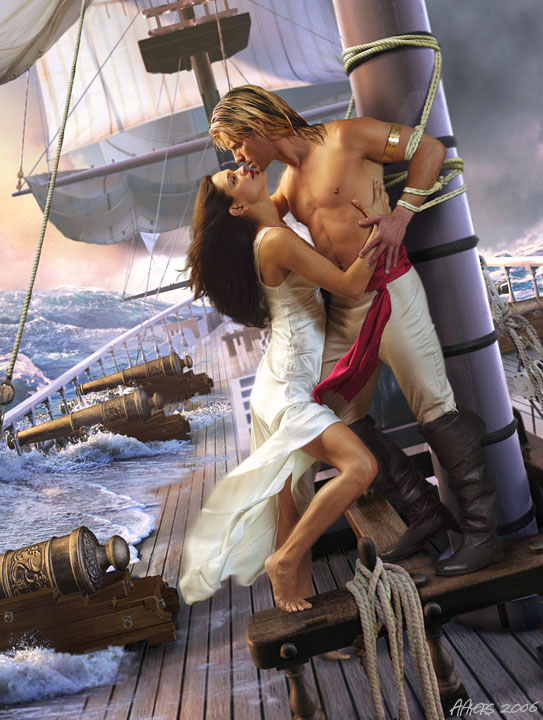
On one side of each page, place one of the following romance novel couples pictures, full page.  (Save your favorite for the cover.) 


On the other side you're going to place a portion of this poem below.   (I also added a little fun fact about the lucky couple on the bottom of each page for later.  You'll see why in a bit.)  I altered the poem for a co-ed Wedding shower.  The original was made just for ladies.  You can find that version and my inspiration here.

Page 1:  This page will read "This game is really easy and we hope that you have fun, no one can tell who the winner will be until the game is done".
Page 2:  Each page of rhymes will tell you exactly what to do. They will lead you to the winner, perhaps it will be you.
Page 3:  Roses are red, violets are blue. Now please pass this book to the person who is just left of you.
Page 4:  (Bride) and (Groom) are counting down to their special day. We're all excited for them, it's not really that far away. Now pass this book on to the person with the most recent birthday.
Page 5:  The bride is still preparing, for there are still things left to do. Now please pass this book to the person with the eyes of brightest blue. But if there are no blue eyes to be completely fair you must give this book to the person who has the darkest hair.
Page 6:  (Bride and Groom) are alter bound, we’re sure their love will thrive. Now please pass this book on to the person who was the last one to arrive.
Page 7:  Wedding bells will be ring real soon, and  "I do's" we'll hear them say. Now please pass this book to the person wearing the most red today.
Page 8: There are many binds in marriage; faith and love are the strongest. Now please pass this on to the man who has been married the longest.
Page 9:  (Street) in (City) is where they will reside. Now please pass this book to the lady who is the newest bride.
Page 10:  Family and friends come here today from places near and far. Now please pass this book on to the person who came furthest in their car.
Page 11:  This game is nearly over. It’s a shame it’s done so soon!  Please pass this book to the person who is the youngest in the room.
Page 12:  (Bride) will be a gorgeous bride and (Groom) will look good too!  The winner of the prize today is the guest to the right of you!  (Please pass this book back to the Lucky Couple.)
I was working up to the last minute so I didn't get a photo of the finished book. 

Give a prize to the last person holding the book.  The book is now a memento for the couple!  Now pass out paper and pencils to everyone and quiz them on the fun facts on the bottom of each page.  Whoever gets the most correct wins another prize!  
Make sure to have extra gifts on hand for ties.  You can do a tie breaker or give out two prizes.  If you have extra gifts at the end, make sure you give one to the runners up on the last game of the day.


Wedding Party and Family Badges


For the co-ed Wedding Shower I am hosting, I wanted the out-of-town family and wedding party to all be acknowledged and recognized at the Wedding Shower and the Rehearsal dinner.  I was inspired by these wedding party badges on Etsy here.


I created my own using these reusable buttons from Dollar Tree.


You can also find these at Michaels in packs of 5.  I used this template to design my buttons using the buttons above as my inspiration.


I used simple fonts, Webdings and Wingdings on black and white backgrounds.  Here's the cheat sheet for those Webdings and Wingdings.


I used Gimp to edit my designs.  It's a free software like Photoshop.

If you don't have Photoshop, you can download Gimp here.  Here are my finished designs based on who was invited to the wedding.


I left space around each design on purpose.  If you use a Badge-a-Minit instead of the reusable buttons, you will need a little extra paper around the edges of your designs that get folded back into the finished button.


To make the Bride's buttons a little more fancy, I took apart a silk rose, cut the petals off individually and rubber cemented them to the back of her button around the pin to make a rosette style button.


Then I added a scrap of book page, v-cut, to the back of both the Bride and Groom's.


You can finish the button further by glueing a piece of felt to the back to cover the glue mess.  Just be sure to cut a slit for the pin back.


These not only helped the staff at the venue for the wedding shower and rehearsal, but that made for great conversation starters at the events and the bachelor and bachelorette parties.  The Bride and Groom can add theirs to their memory box after the event.


Future Mum and Pop Gifts


Went to a gender reveal party the other day.  It was not a baby shower but I still wanted to bring a little gift for the hosts.  My inspiration was this Father's Day gift.


Here's what I put in mine:


I wanted something for the mom to be too.  It was harder to think of mom puns but I went with a potted Mum and a Hershey's bar wrapped with gauze to look like a mummy.  The inspiration for the mummy candy bar and tutorial came from here.


I bagged them both in clear gift bags and added "Future Mum" and "Future Pop" tags to both gifts.


Here's what I came up with:


If you have any other "Pop" or "Mom" puns you want to share let me know!  I would love suggestions for next time!

Thanks for Reading!


Hair Supplies Drawer: Organized!


After months of digging through a pile of hair binders, clips, bobby pins, brushes and other hair doodads, I finally organized my drawer simply and cheaply with votive cups from Dollar Tree.


The cups left a bit of a gap in the middle of the drawer that was perfect for my brushes and mirror.  The combs are tucked in the front for easy access.  I also slipped in the tab from the box of hair coloring I used last time if ever I want to try it again.


I organized my stuff into these categories: bobby pins, hair clips, small black binders, large pony binders, safety pins (not really a hair thing but I had tons), pony beads, bun maker, and misc hair gadgets and combs.  I put the ones I use the most up front.  The drawer held 8 cups perfectly.


This would also work perfectly for organizing make-up, jewelry, sewing supplies, craft supplies, kitchen doodads...you name it!

Tuesday, January 24, 2012

Simple Dollar Store Dessert Buffet


Candy and dessert buffets seem to be everywhere right now. But you don't have to pay big bucks and have custom designed cookies and fancy chocolates to pull off the effect. Here's the breakdown of a great dessert buffet that you can make from dollar store items in a fraction of the time.

1. TABLE Pick a long or rectangular table as your base. Cover with a plastic table cloth to fit theme color. Pick a back drop for the table. A complimentary colored tablecloth or bed sheet, a line of helium balloons, paper accents, a string of flags and frames work well.


2. CENTERPIECE Choose a large centerpiece as a focal point. If you have a cake, place it on a cake stand in the middle. A cupcake tree will work as well. A party tree is an easy idea that can be catered to any theme. Just spray paint dried branches to match the theme color. Place in a container and decorated with small items or glitter. A large floral bouquet works well too.

3. DISH WARE What makes a dessert buffet elegant is in the manner in which everything is displayed. Symmetry is key. Try to balance each side of the table with the same heights and shapes of containers. Also, placing anything on a pedestal makes it seem more elegant. You can make your own hurricane glasses, cake plates and tiered serving dishes with glass and silver tray and plates and glass candlesticks and upside down ice cream glasses super glued together. (See examples below). You'll want to grab a few plain plates and trays too. I saw white rectangular sushi plates at the Dollar Tree that would be excellent. Keep the dishes in the same scheme, all black, all white, clear and silver etc. Levels are important. If the display is too flat, use boxes wrapped in gift wrap to give it height and add to your visual theme.


4. DESSERTS Once you have the table set up, you just need to fill it. here's some quick ideas that can be catered to any theme using dollar store foods. You don't need a lot of each. Variety is the idea. Think 6-8 of each item for an average sized party:

*PUDDING CUPS- Simply open cups of pre-packaged chocolate or tapioca pudding. Pop in a plastic spoon, top with whip cream (if desired) and an unwrapped chocolate accent (such as chocolate bunnies or hearts). Display 6 cups on a tray or directly on the table with small napkins under each cup.

*GELATIN CUPS- Same idea as the pudding cups but top with themed gummies. If your dollar store doesn't have these, make your own in clear glasses with a pkg of Jell-O.

*SUCKERS- Suckers can be really neatly displayed. One idea is to fill a lipped tray with floral foam. Cover foam in cling wrap. Neatly line up suckers by poking them in the foam. Cover exposed foam with loose candy like M&Ms or jelly beans. Pots for plants work too. Another idea is a sucker tree. Grab a floral cone this time and cover with suckers. Than wrap from top to bottom in ribbon, going between the sucker sticks and covering the exposed foam.


*MARSHMALLOW POPS- Very simple to make. Place a large marshmallow on a length of bamboo skewer. Dip the top in melted chocolate or a dab of frosting. Accent with a single M&M n your theme color or candy sprinkles. Display in the same manner as the suckers.


*LOOSE CANDY- Loose candy works well in wide mouthed containers like the ones you find in the candle section. Fish bowls work great too. If the candy is not individually wrapped, make sure to stick small scoops or soup spoons in each container. Twizlers and long twisted suckers look great in tall hurricane glasses.

*COOKIES- Any cookie looks good lined up on trays.

***NEW***
* FUDGE- check out this recipe for 2 ingredient fudge!

*CUPCAKES- you can make your own using dollar store liners, cake mix and frosting, but to save time, just get some plain ones from the grocery store. Top with themed favors, rings or candy rings from the dollar store.

*CANDY BARS- Regular or miniature candy bars are a great addition. Get ones with paper sleeves like Hershey bars and remove wrapper leaving the silver paper. Recover with custom printed candy bar wrappers or scrapbook or wrapping paper that fits your theme.


5. TABLE ACCENTS- Great table displays will have a color or pattern theme. Use scrapbook paper, ribbon and wrapping paper to pull in the theme. Cover box risers in wrapping paper. place scapbook paper under dishes or cut to fit as tray liners. Use ribbon to add color themed bows to the pedestals of the dishes and to wrap lipped trays. Many people like to label items too. Cut small shapes from white tag board or index cards. Or use pre-made place setting cards from the wedding isle. You can place them on the table in front of each dish or loop them around tall containers with ribbon (securing them with a dab of glue or tape in the back so they don't slide down.


That's it! You now have a very professional looking dessert buffet. Try it for other displays too like party foods and snacks, cheese with crackers and fruit, chocolate only, cookies, wedding favors, or even non food decor like a collection of small gourds and pumpkins for Halloween or a collection of baby items for a baby shower. Get creative!

Break Down of Costs (save money by using things you have on hand already):

Table cloths, backdrop and accets $5
Centerpiece 5
Dishes and serving trays, scoops 20
Tags, ribbon, paper 5
6 geletin cups with gummies 3
6 pudding cups with chocolates 3
marshmallow pops display 5
suckers display 4
candy bars with wrappers 2
1 kind of cookie 1
3 kinds of loose candy 3
cupcakes with toppers 4
_______
TOTAL $60