Pages

Wednesday, November 17, 2010

No Measure Cookies


I found this awesome recipe on Busy Bee Kids Crafts.com and thought I just had to try that with dollar store items!


Here's what you'll need...


•Cake mix (any will work)
•½ cup butter (1 stick)
•1 egg

Here's how to make them...

1. In a large bowl mix all ingredients.


2. Roll into balls (about a tsp full) and place on a greased (or parchment lined) baking sheet.

3. Bake at 350F for 8-10 minutes. Yields 2-21/2 dozen


Tips:
-Let cookies cool on the pan before moving them to a cooling rack, they are fragile
-It's easiest to mix the batter and form the balls with your hands
-Space out the cookies a bit on your cookie sheets or they will fuse together
-Wash hand between mixing the batter and forming the balls or the dough will stick to your fingers
-When mixed properly, the dough will be like crumbled brownie


This recipe reminds me of the Yogurt Cake Recipe that my hubby taught me. What's great about both recipes is that you don't have to have any measuring cups or spoons. Very handy if you're traveling, especially out of the country where the measurements are different. Also great for kids and college students. Both recipes are extremely adaptable. Try these variations below:

Cookie Variations:

-Yellow cake mix balls rolled in sugar
-Yellow cake mix and liquid or paste food coloring to make pink or green cookies
-Chocolate cake mix and chocolate or butterscotch chips
-Chocolate cake mix balls with white chocolate chip topped with crushed pepper mint candies
-Rainbow chip cake mix makes pretty cookies
-Lemon cake mix with poppy seeds
-Spice cake balls rolled in sugar


Cake Variations:

-Line pan with pineapple slices add cake mix, turn upside down after baking and drizzle with caramel
-Chocolate drink powder mix in with Nutella frosting
-Lemon juice and grated rind mix in with powder sugar and water glaze
-Chocolate chip or M&M mix ins
-Grated carrot and chopped walnut mix in with cream cheese and sugar frosting
-Use brown sugar instead of white and add all spice with a powder sugar and water glaze
-Shredded coconut and pineapple mix in with white frosting sprinkled with more coconut

Can you think of any other combinations?


Saturday, November 6, 2010

Frames Frames Frames!

I have a new found love for dollar store and thrift store frames. After moving to Uptown Minneapolis and living in these beautiful old homes, I decided that regular art work wouldn't do and that the wall need to be covered in collections of unique frames that compliment the style of the home.

I've always been intrigued by 'Cabinets of Curiosities' and thought I'd put together one of my own using sentimental items that I had stored up, and that were traveling back and forth with me from the US to France, but who never left their box because I didn't know what to do with them!

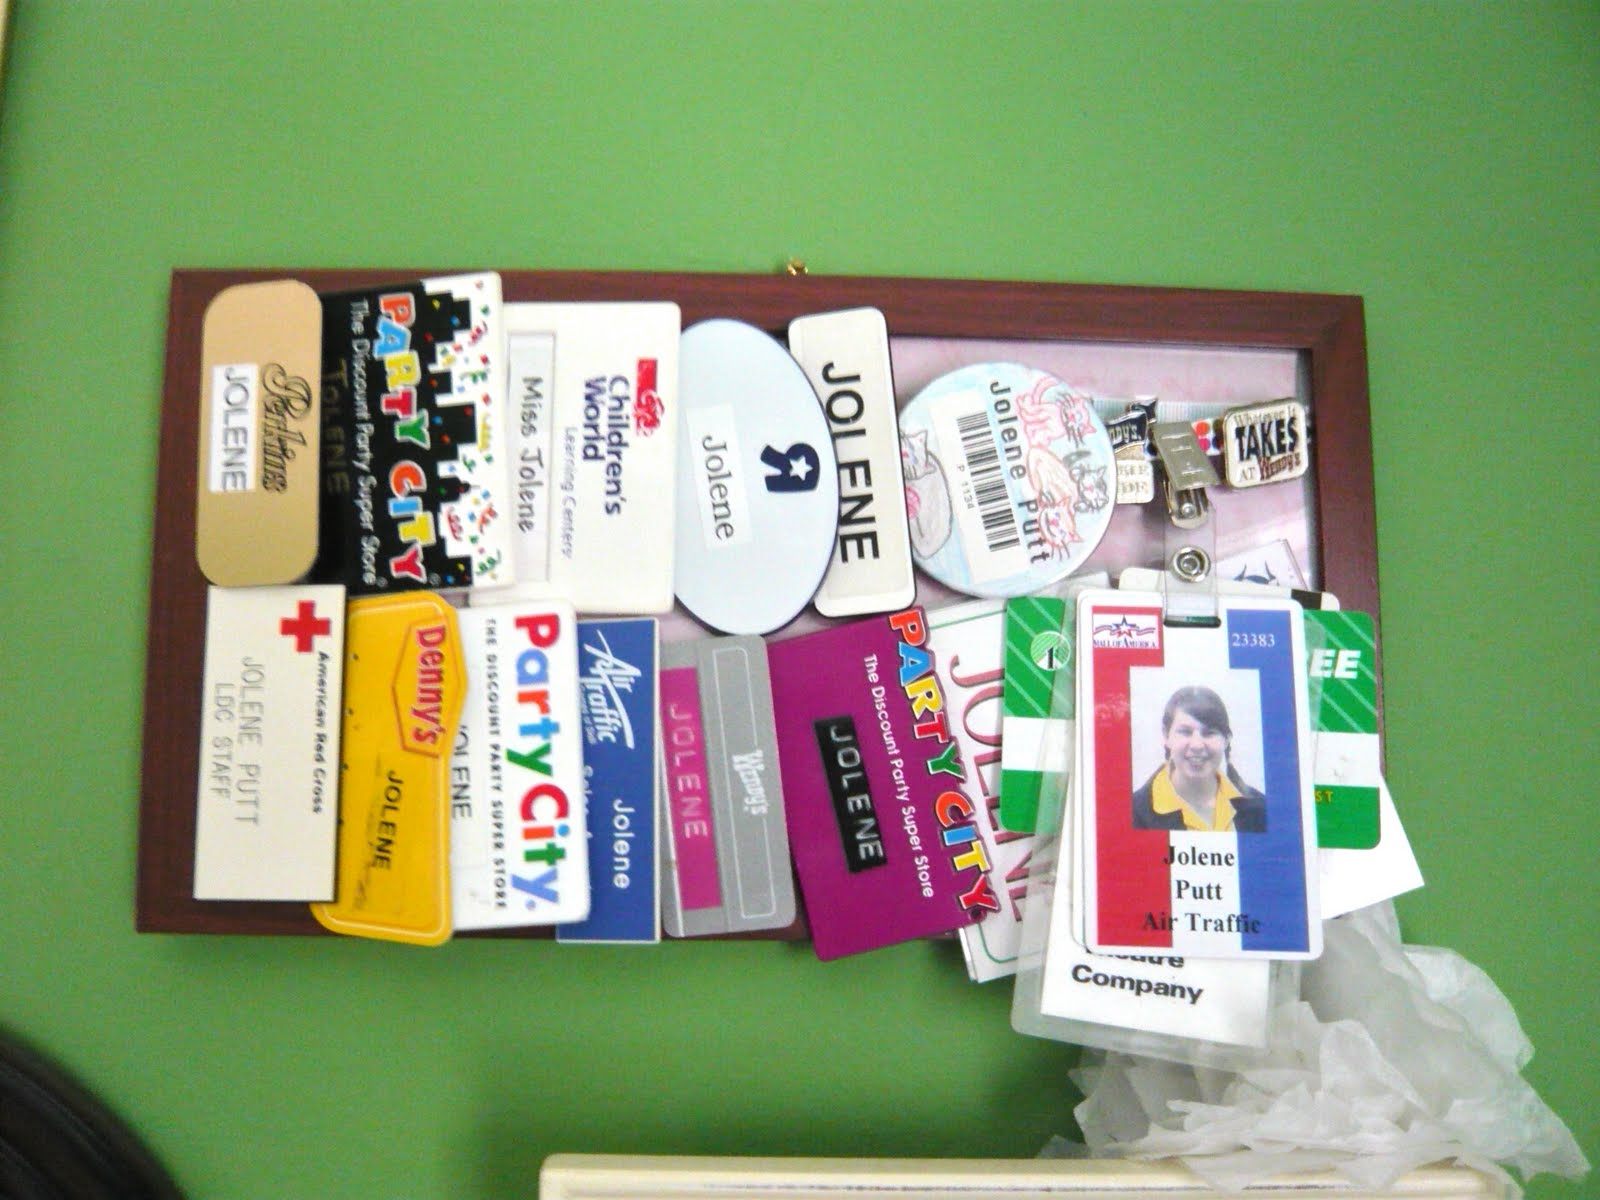
I'm always telling my mother-in-law (a bit of a pack rat) that "if it's worth having, then it's worth displaying". So in trying to live up to my own advice, I got out all my old buttons, work name tags and cards (I have had many small jobs), keychains from various vacations and events, foreign stamps and money I collected, and jewelry and displayed them as best I could. Here's what I came up with:


I flanked either side of a window with a collection of frames. (Lost the photo of the other side, sorry.)


To make the necklace holder, I removed the glass of a picture frame and wrapped it in green satin and then replaced it in the frame. Then I took the eye screws from a dollar store picture hanging kit and placed them all along the top of the frame and one on each side. Then I simply hung necklaces on each hook.


I used a thrift store frame and some scrapbook paper to mount this joke money that I probably bought at t,he dollar store around Christmas time.


I used butterfly images that I found on Flickr and printed them out. Then I glues the front images to the back images back to back, bent the wings back slightly and attached them to a dollar store mirror with a small roll of clear tape. Martha Stewart has some great butterfly clip art right now. If there are no butterfly images with the undersides, simply glue two fronts together back to back. Because the butterflies are on a mirror, the back side will show a little so you don't want to leave them blank.


These two shadow box frames, with the glass panes removed, house trinkets from my Grandma and Grandpa, now deceased. I used different papers for the backgrounds. For Grandma, the blue paper with french words on it that came with the frame, and for Grandpa, a part of one of his fishing maps. I used hot glue and tape to secure all the pieces in place, being careful so that I could remove items later if I wanted too.


This dollar store frame has simply a piece of brown grocery bag inside decorated with a symmetrical arrangement of stamps from around the world. You could do the same with all US stamps of different themes.


This is my somewhat shameful but mostly awesome collection of work and volunteer badges. Yes, I've done it all and I'm proud of it! I placed scrapbook paper behind the glass and then taped two lengths of ribbon horizontally across the front of the glass, taping it securely behind the glass. Then I simply hung or pinned the tags to the ribbons.

For this collection of buttons, I wrapped the glass of a picture frame with two layers of T-shirt material, taping the back, and replaced it in the frame. Then I pinned buttons to the fabric. A similar idea can be used for dangly earrings. Just remove the glass entirely and replace it with a piece of mesh screen or plastic needle point mesh. Glue in place with hot glue and hang earrings in the holes.


Another cool thrift store frame that had an alcohol ad inside. I replace it with scrapbook paper and scotch taped coins inside. The bills are attached with Ticky Tack.


For this hanging arrangement, I took a pack of dollar store cup hooks and, using a lot of elbow grease, screwed them inside a thrift store wooden tray. Then I attached a picture frame hanger on the back to be able to hang it vertically. I filled mine with keychains I had collected but you can use this set up for lots of things like rings or bracelets or any other trinkets that can be hung. Make sure you space your hooks to accommodate the length of the items you plan to hang.


Here's that same group of frames at our new apartment in another arrangement.


Here's another use of dollar store frames. This time it's for Halloween. I bought four antique photo frames with images inside that change from vintage to haunted as you move in front of them. The Dollar Tree had these but I saw them for more than a dollar at Target and other places too. They were light weight plastic frames so I took wide brown satin ribbon and taped then to the back of the ribbon. I topped the ribbons with a hand formed bows and then just taped the whole thing to the wall. One on each side of our entry mirror.


They looked so pretty that even though Halloween is over, I think I'll look for frames of the same size and reprint some old family photos to have them up all year long. I'll attach the frames to the walls more permanently this time because tape only holds for so long.


Above the TV, we made another cabinet of curiosities using vintage specimen prints, images from anatomy books and the butterflies from the first arrangement. All these frames came from the Dollar Tree. The large shell print is another Martha Stewart find.


The small butterfly was already framed at the Dollar Tree and I didn't modify it at all.


Finally, The frames above were both thrift store finds, the large print and the two long ones were the kind that have a mat inside to hold four different photos. The images came from a three part poster that one of my husband's Christmas gifts was wrapped in last year. The poster was so cool that we saved it in the back of the closet forever. We trimmed the images to fit the frames and hung them all together as on collection. Very proud of this one as I only used items that we already had sitting around the house!

I'm so pleased at how awesome our house looks, and at a fraction of the cost of buying ready made art would have been!

Have you done similar? I'd love to see your ideas!


Friday, October 1, 2010

Cocktail Party Foods, Quick and Easy


While planning for our Halloween Housewarming Party, I had trouble compiling a list of simple finger foods and appetizers that were quick and easy to make and didn't cost a fortune. I also wanted items that had an elegant feel and that displayed well so...in compliment to my previous post on a super simple dessert buffet, here's my ideas for a Cocktail Party Buffet:

*Calculator: Consider 12 bites, pieces and ounces of dip per party goer for the entire evening when no dinner is served.

Quiche:

Simple Quiche

Ingredients:

  • 3 eggs
  • 1 ½ cup 2% milk
  • 1/4 tsp salt
  • 1/4 tsp black pepper
  • 6 oz shredded cheddar cheese
  • 1 cup chopped onion
  • 1 pie shell

Directions:

  1. Lightly beat eggs then and the rest of the ingredients.
  2. Mix and pour into pie shell.
  3. Cook at 325 degrees for 30-45 minuets or until when poking it with a toothpick the toothpick comes out clean.
Try adding ham, leeks, asparagus or broccoli

Bake several and slice into thin wedges. Serve on a raised cake stand. You can bake these a day in advance and serve them cold or warm.


Savory Cake:

Bake on or two and, when cool, cut into large cubes or slices. Serve on a pretty platter. Eat with fingers or using picks. Serve tied or cold.


Verrines (glasses):

Use small juice size glasses or disposable glasses to display little bites of things. The easiest ones are placing a dallop of veggie dip in the bottom of the glass and standing a celery stick, carrot stick, slice of bell pepper or any other long veggie in the dip. Another simple one is filling the glass half full of guacamole and topping with an upright tortilla chip or two. Cold soups also work well. Include a small spoon if needed. The trick to beautiful verrines is filling them without glopping it down the sides and topping it with an accent.


Cuilleres (spoons):

Get a bunch of those flat bottomed asian soup spoons from a asian grocery or thrift store inn ceramic or plastic. You can also buy cheap soup spoons and bend the handles down. Top with a bite of something and display in rows atop a rectangular sushi plate or similar. Try a bit of guacamole toped with a cocktail shrimp or some caramelized onions with a morsel of chicken. Anything you can make full size looks awesome in mini bites.


Veggie Tray:

Always a cheap and impressive addition. Try to incorporate a variety of colored veggies and arrange them in a decorative manner. Top with veggie garnishes for even more class. Try radish roses, carrot curls, and stars or other shapes cut from slices of cucumber.


Canapes:

Grab a loaf of any kind of sliced bread and freeze. Once frozen cut the crusts off each slice making a square piece of bread. Top slices with various spreads like tarama (pink fish egg spread), eggplant caviar, humous, pate, flavored cram cheese, etc. Go for at least two color of spread and then cut each slice into four smaller squares. Arrange canapes on a large rectangular tray in checkerboard fashion.


Blinis (mini pancakes):

Use any plain pancake mix and, using the same size scoop, make as many mini pancakes as you can about the size of a silver dollar or a bit larger. Careful, they cook quickly. Once cool, arrange them on a tray next to a bowl of taziki sauce (plain yogurt mixed with finely chopped cucumber and a bit of salt to taste). If you have a lot of time, you can pre top the bilinis with fish eggs, sauces, or whatever and lay them out.


Popcorn:

Popcorn is another buffet staple because it costs next to nothing and everyone loves popcorn. I's all about display here. No jumbo popcorn bowls at a cocktail party! Try paper cones in a cupcake holder or set upright in glasses. Or use newspaper or scrapbook paper to make large oragami paper cups, fill and line them up on the table.


Any other ideas? I'd love to hear what your buffet staples are!


Sunday, September 19, 2010

Good Things

Beautiful things that you can replicate with dollar store materials:

1. Anthropology inspired mirror

Materials needed:
3-5" round Dollar Tree candle mirrors -$3
1- full length mirror with black frame - $15 at Target
1- Dollar Tree double pack of electrical tape- $1
1- Dollar Tree tube of super glue- $1
TOTAL -$20


Instructions: position three round mirrors evenly down the center of the long mirror and glue in place with super glue. Let dry over night. Tape straight lines from the round mirrors out to the edges and down the center. Carefully tape around each round mirror, being careful not to stretch the electrical tape too much. It can result in peeling later. Hand mirror vertically or horizontally.

2. Placemat pencil cups

Materials needed:
2- Dollar tree placemats -$2
thread and sewing machine or needle -on hand
sewing pins- on hand
TOTAL -$2


Instructions: Cut one rectangle each out of two contrasting place mats along the edge of the place mats. Cut one circle each out of the remainder of the place mats. Sew both rectangles into a tube along the short edge. Place one rectangle inside the other with seams facing each other. sew the hemmed edge of the rectangles together. Turn that piece inside out and pin circle to bottom with patterns matching. stitch in place. Turn right side out and fold down the top inch.

3. Paper Bag Vases

Materials needed:
1- bag of Dollar tree lunch sacks -$1
assorted rubber stamps- on hand
white stamp pad- on hand
TOTAL -$1


Instructions: Cut brown paper lunch sacks down to size. Stamp front and back stamps in white ink. Place any container inside such as a bowl, jelly jar, or glass. Fill with flowers. Make several designs and store flat for whenever you need them.

4. Lace Doily Bowls

Materials needed:
1- crocheted lace doily -$1
bowl- on hand
liquid starch- $2+
TOTAL -$3+


Instructions: Completely soak the lace doily in liquid starch. Drap over the back of an upturned bowl and smooth down. Let dry over night or until completely dry. De-mold and fill with lovely things.

5. Clip Bookmark

Materials needed:
1- set of large clips- $1
1- permanent marker- $1 (or rub on words)
TOTAL -$2


Instructions: With a marker or rub on words. Decorate a large office clip and use as a bookmark or mail clip.